
To prevent YouTube from lifting your blacks on Lumix S5IIX V-Log footage, set your output color space to Rec.709 (Scene) in DaVinci Resolve. On macOS, this aligns the timeline viewer with QuickTime's ColorSync engine and automatically embeds 1-1-1 NCLC metadata into your export, ensuring YouTube processes your intended contrast without shifting gamma.
If YouTube seems to be lifting your blacks on Lumix S5IIX footage, don't blame the compression engine.
It is rarely a platform trying to ruin your grade. Most of the time, it comes down to an easy-to-miss 1-1-1 metadata handshake between your export and the web transcoder.
When you spend hours dialing in skin tones and shadow roll-off, seeing your work flatten out in a browser is frustrating. But once you close the loop and verify what the platform actually does to your file, the mystery disappears. Here is the exact setup I use to ensure a clean round trip.
The Setup & Core Context
In DaVinci Resolve, everything starts in Project Settings > Color Management.
For the Timeline Color Space, I work in DaVinci Wide Gamut / Intermediate. This wide working space gives your V-Log footage plenty of room for grading without clipping highlights or compressing saturation prematurely.
For the Output Color Space, select Rec. 709 (Scene). This was introduced in DaVinci Resolve Version 20 and works very well. Previously, I used Rec. 709A with gamma 2.2 for web delivery, but Rec. 709 (Scene) has completely replaced it.
Project Settings > Color Management
On a Mac, this setting solves a long-standing headache. It does not simply apply a static Gamma 2.4 curve. Instead, Rec.709 (Scene) aligns Resolve's internal viewer directly with Apple's ColorSync engine. What you see inside Resolve matches what you see inside QuickTime Player.
Activate the Mac display color for viewers
Crucially, this setting also writes the 1-1-1 NCLC metadata atom (Color Primaries 1, Transfer Function 1, Matrix 1) directly into the exported container header. That metadata tells downstream players and web transcoders: this file is standard SDR Rec.709. Do not apply an arbitrary gamma compensation curve.
Output Color Space Rec.709 Gamma 2.4
1-1-1 NCLC metadata (Color Primaries 1, Transfer Function 1, Matrix 1)
What I learned
To confirm whether this metadata handshake actually protects the grade, I ran a closed-loop null test.
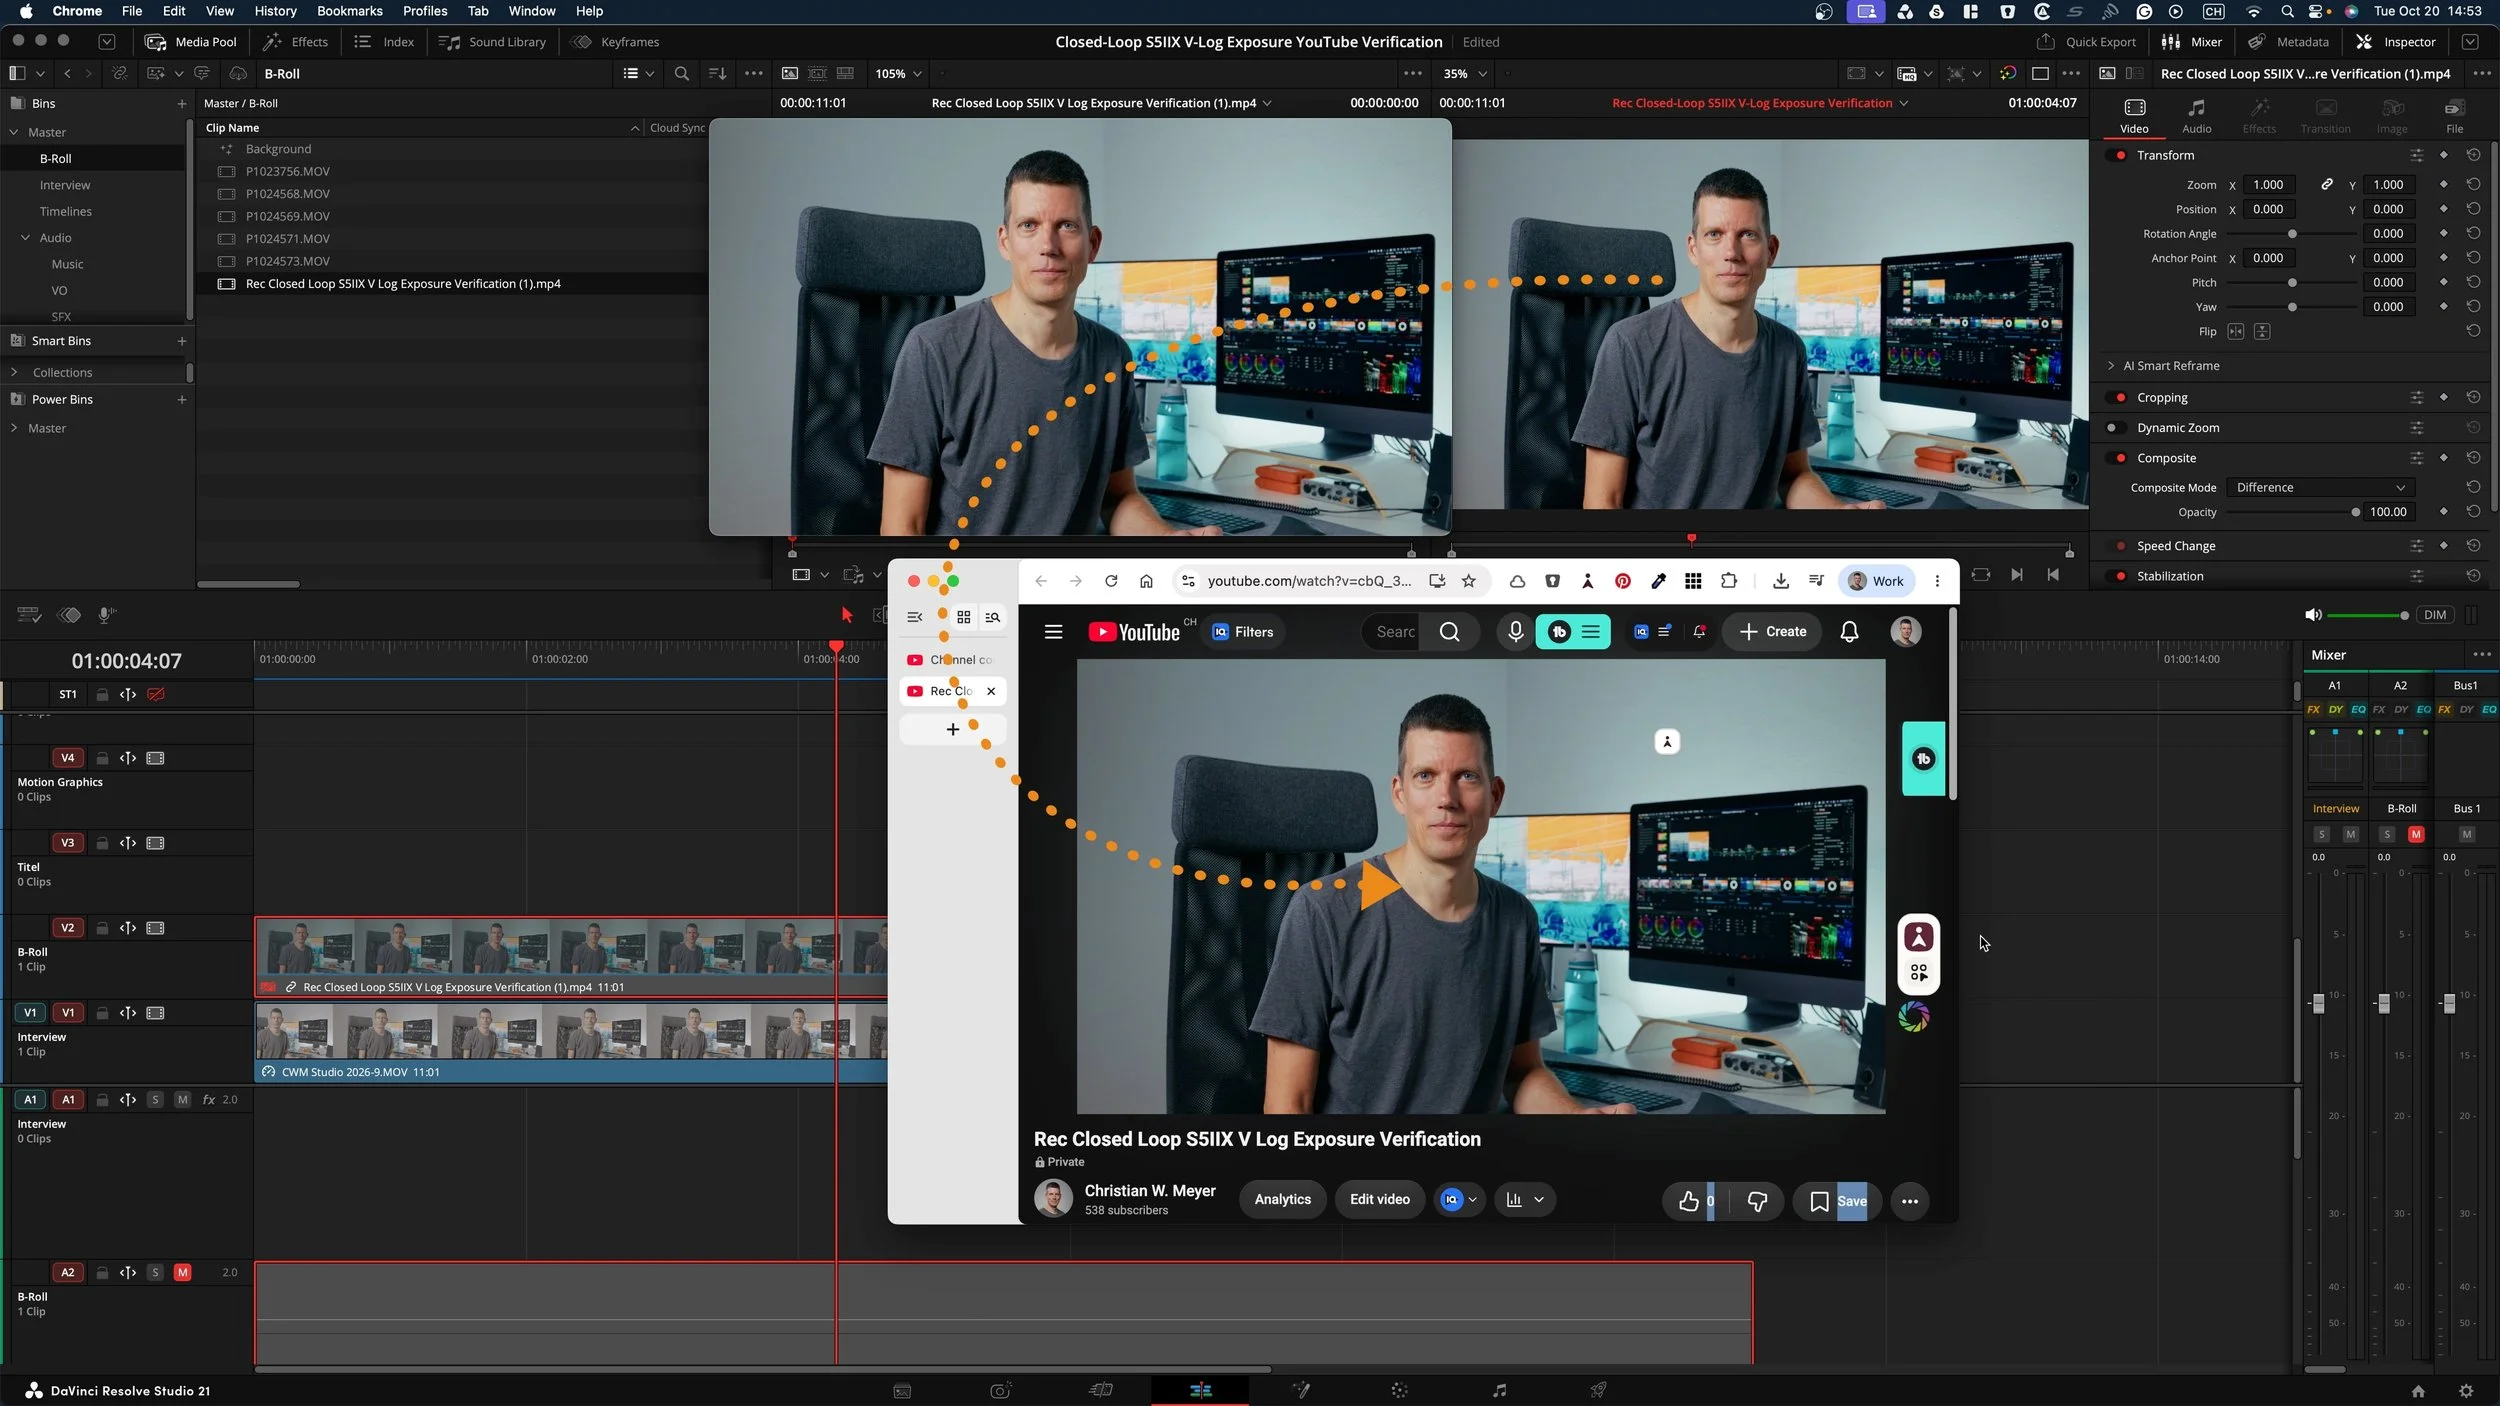
I exported a finished 4K master, uploaded it to YouTube as an unlisted file, let it process through high-resolution encoding, and downloaded the file back from YouTube Studio.
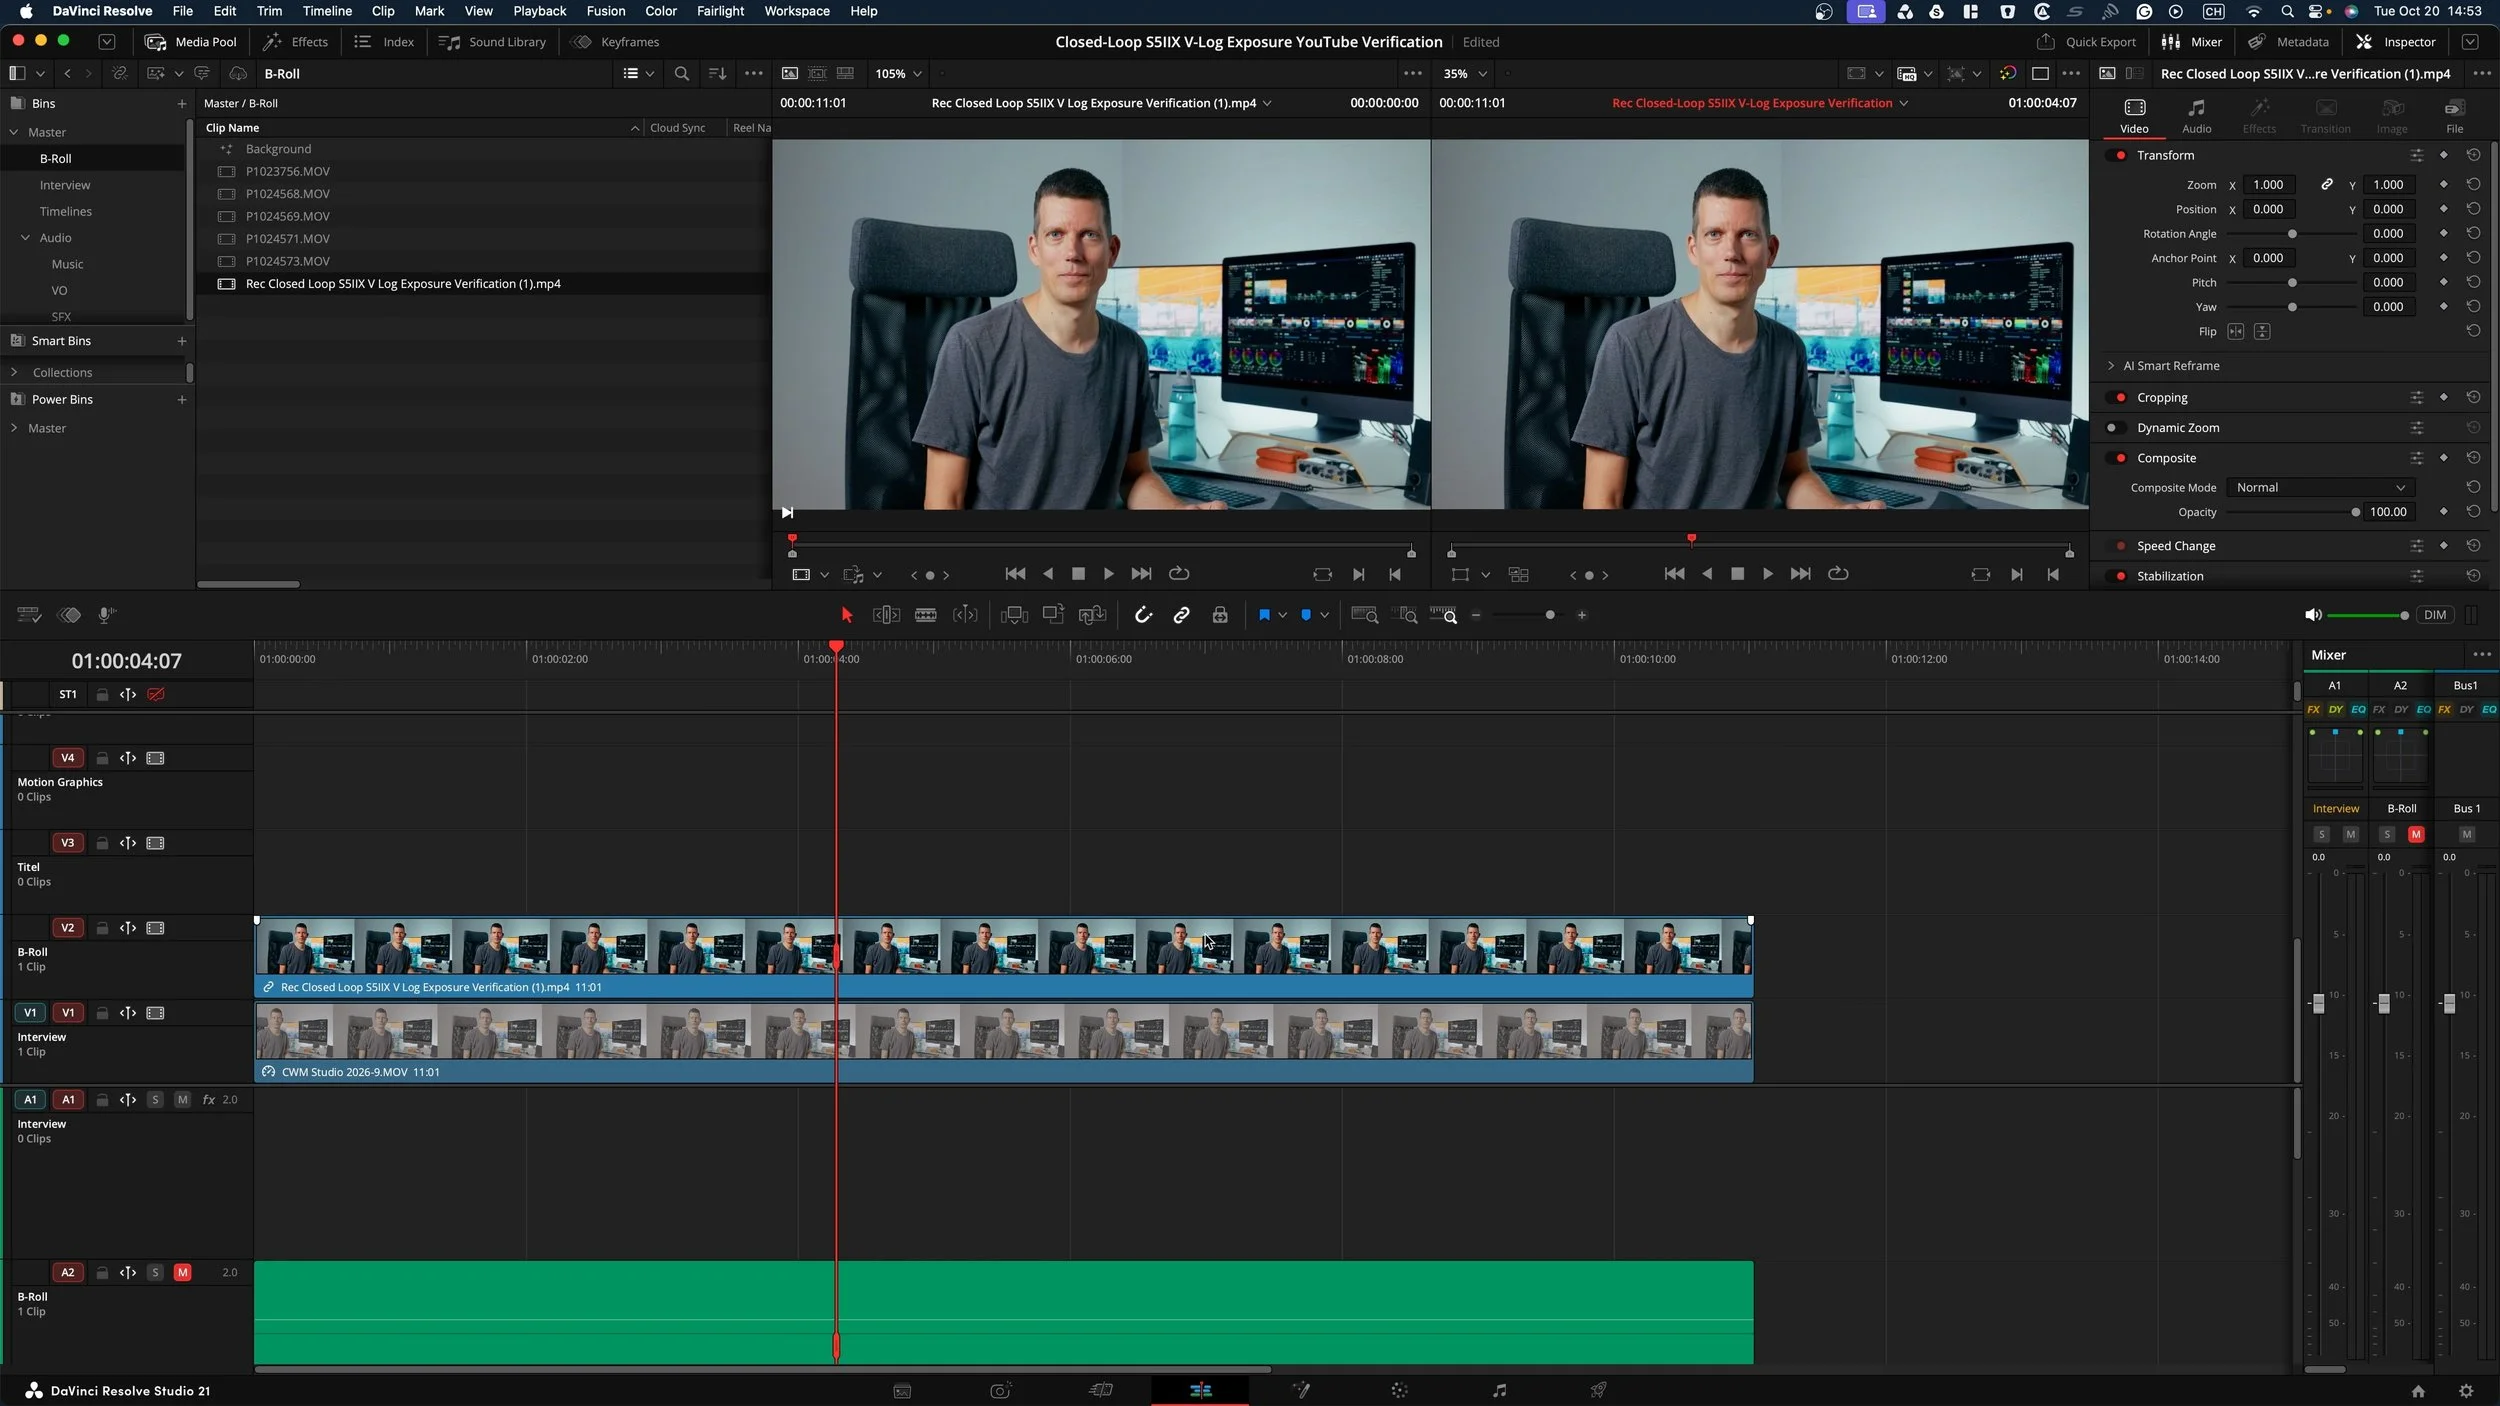
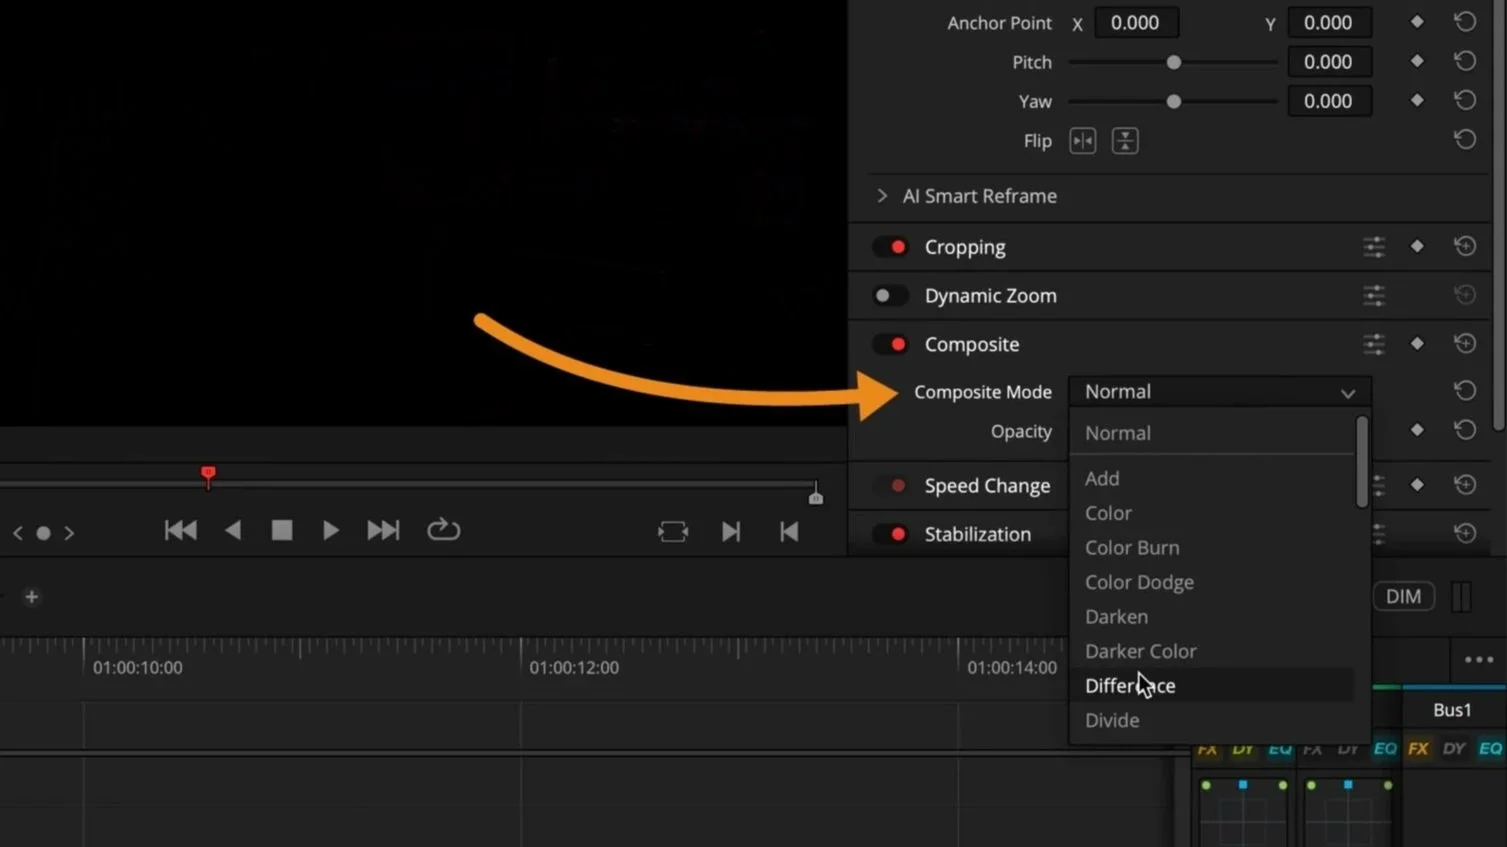
Then, I stacked both files on a fresh Resolve timeline: master on Track 1, YouTube re-download on Track 2. Setting Track 2's blend mode to Difference gave the definitive answer:
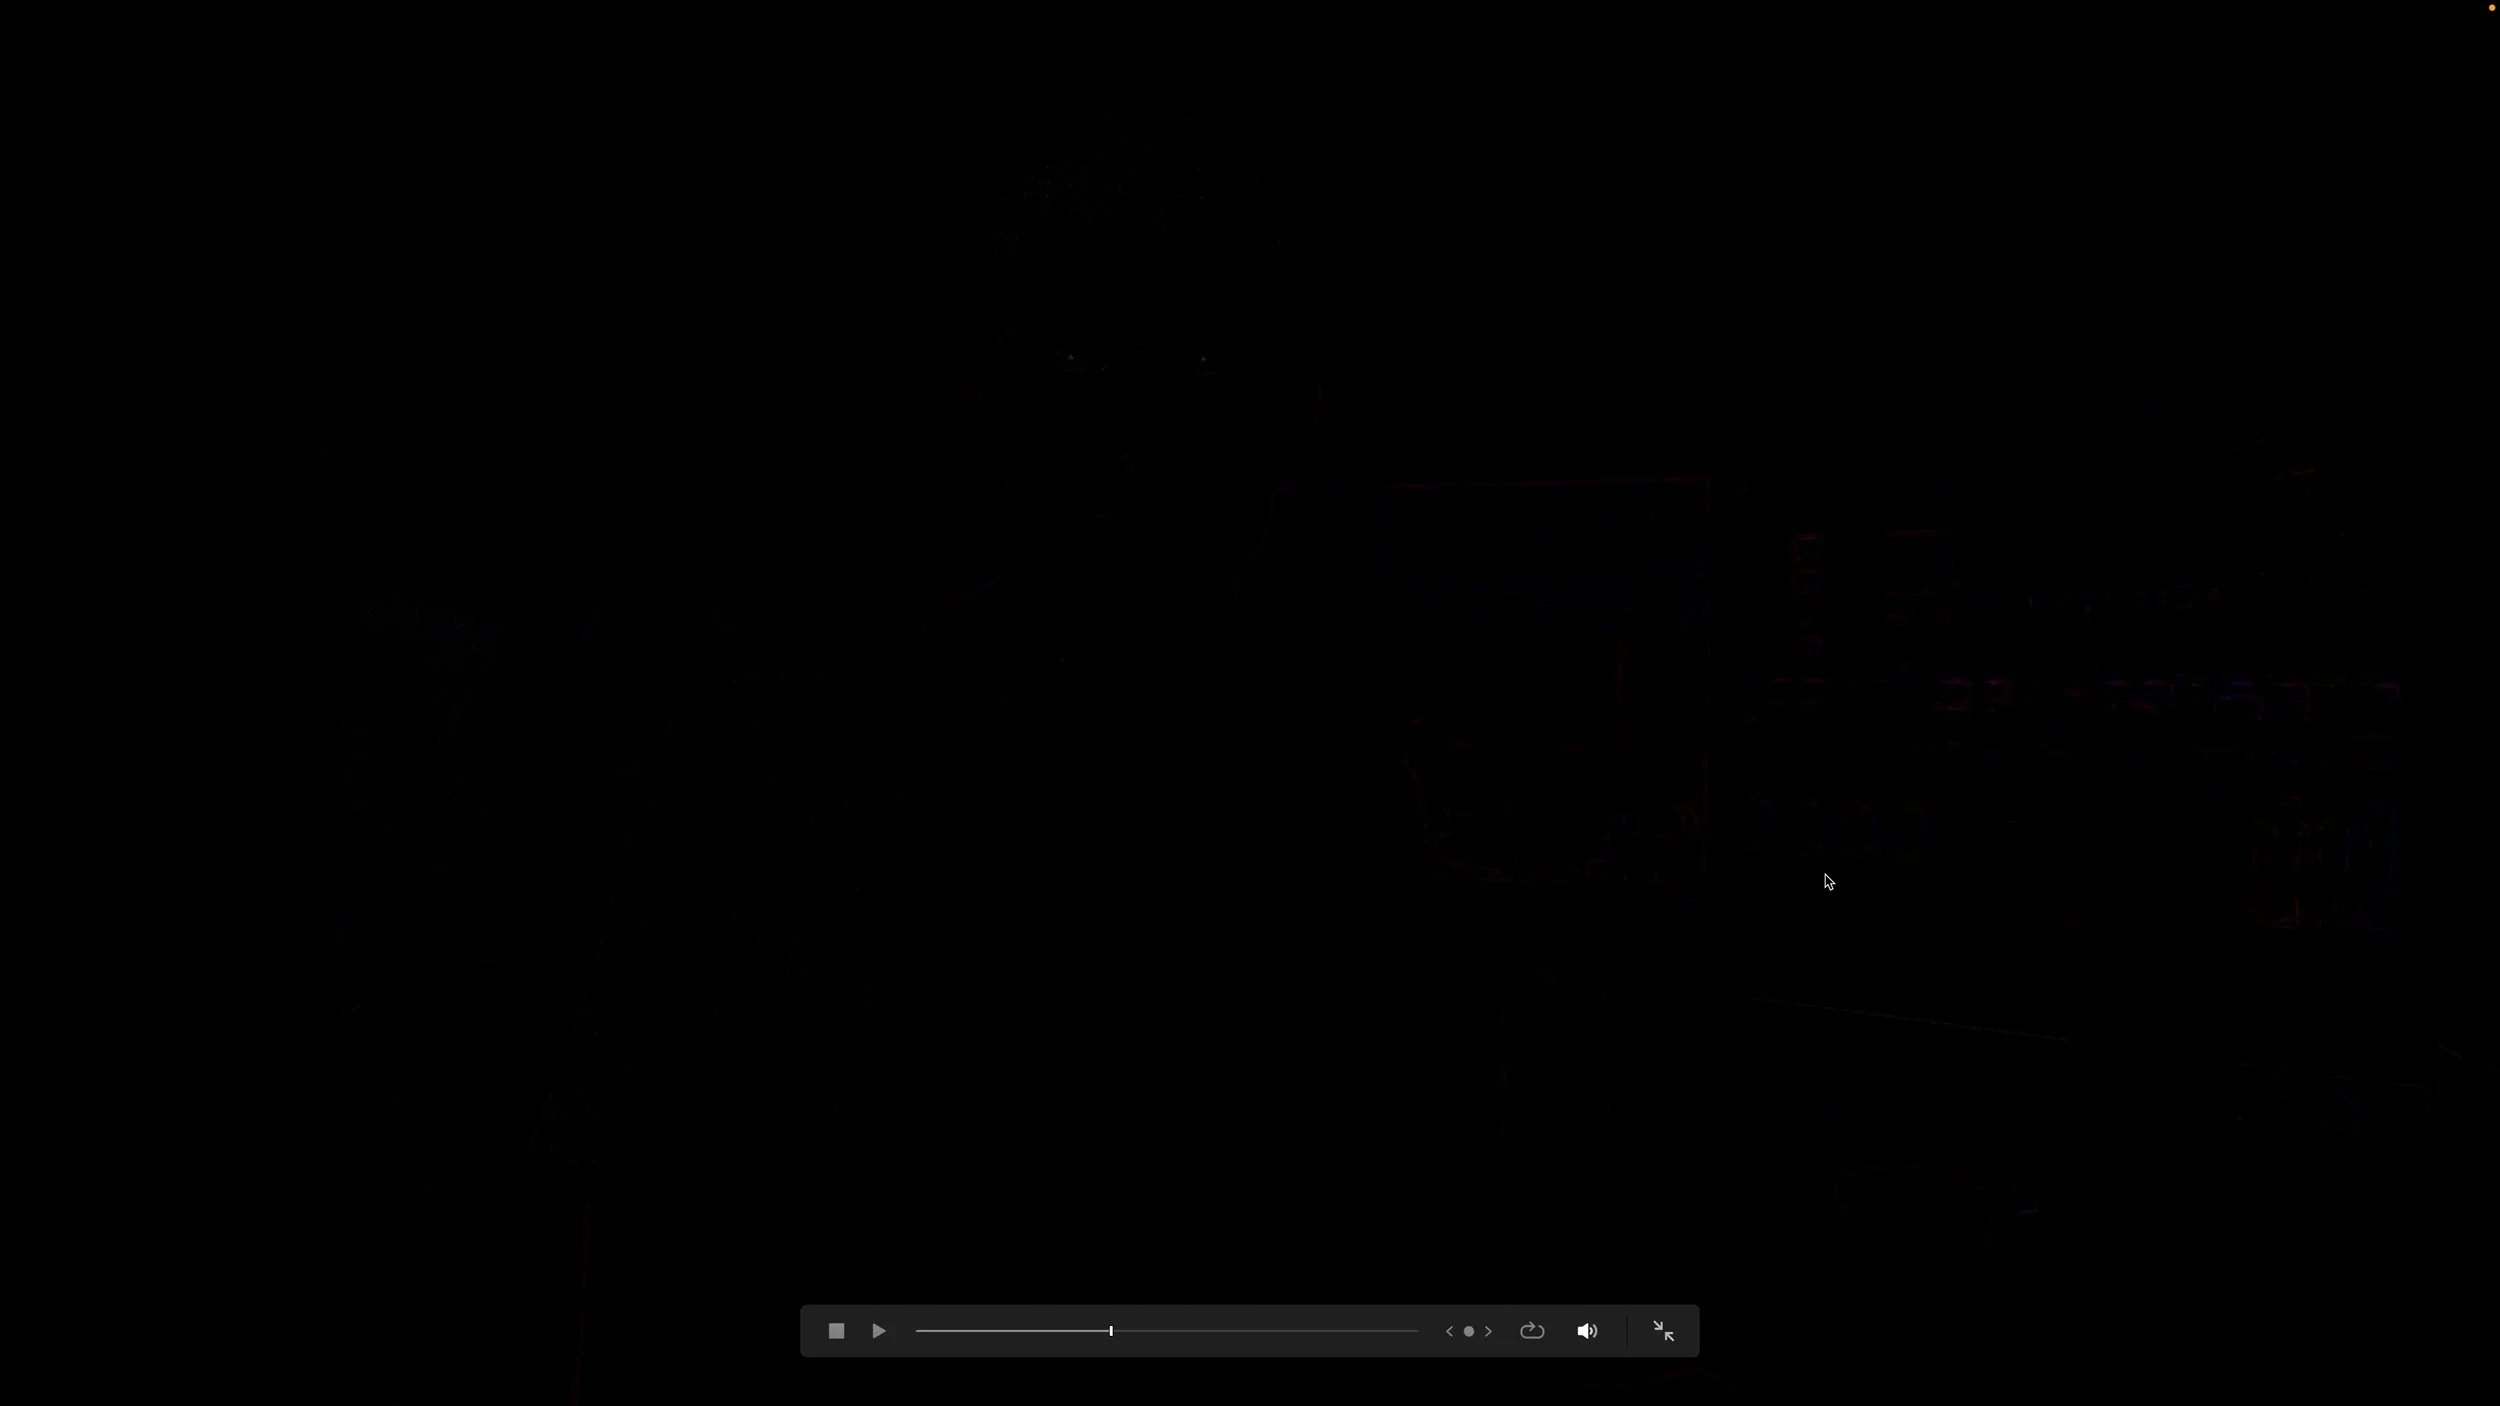
The preview monitor collapsed into near-total black.
A Difference composite subtracts one image from the other; identical pixels cancel out to pure black. Aside from microscopic edge compression inevitable with web streaming, the contrast curve, shadow floor, and color balance were identical.
No hue drift and no lifted gamma. The pipeline is transparent. YouTube does not ruin your image when you supply explicit 1-1-1 tags.
What this means for the Exposure Toolkit
While calibrating my CWM Exposure Toolkit, this closed loop was essential.
The toolkit focuses on getting clean exposure on set—using a safe baseline of ETTR +1 up to a Max ETTR of +3 to place your signal right in the sensor's sweet spot. That on-set pipeline protects your shadow textures from noise before you ever sit down to edit.
Proving this delivery loop is transparent means you get a genuine "what you see is what you get" experience from sensor to screen. You can grade into your shadows with confidence, knowing the viewer will see the exact contrast you shaped in the bay.
Try this yourself
You can verify your own pipeline in five minutes:
In Resolve Color Management, set your Timeline to
DaVinci Wide Gamut / Intermediate and Output to Rec.709 (Scene).
Export your grade in 4K UHD.Upload the file to YouTube as Unlisted and wait for 4K processing to complete.
Download the file from YouTube Studio.
In Resolve, stack the YouTube file directly above your master and set Composite Mode to Difference.
If the frame goes nearly black, your delivery loop is perfect.
The waitlist is open
I'm launching soon. You can join the waitlist today to lock in early-bird pricing plus early access.
👉 Join the waitlist
And if you want the full technical breakdown before then, the product page has everything:
👉 CWM Exposure Toolkit · S5II / S5IIX Edition
Let's take the guesswork out of V-Log.
— Christian
🛠 TOOLS & SOFTWARE I USE
🎨 Dehancer Pro (Film Emulation)
To add organic film grain and halation to the toolkit, I pair it with Dehancer. 👉 Get 10% off with
code CHWM10: https://go.christianwmeyer.com/DehancerPro
🔊 Audiio Pro (Royalty-Free Music)
My go-to music library since day one on YouTube. 👉 Save 70% on your first year: https://go.christianwmeyer.com/AudiioPro



If YouTube lifts your blacks on S5IIX footage, it is usually a missing 1-1-1 metadata tag. Here is how to lock your color loop from Resolve to web delivery.